.png)
How to achieve the perfect sunset editing with Lightroom
- Sandra Duran
- Mar 17, 2020
- 4 min read

If you follow me on Instagram, you might have noticed that I'm a #sunsetlover! I'm such a sucker for cotton candy and on fire skies. But, sometimes our photography skills are not the best to capture the perfect shot at the perfect time and need to work on the picture a bit afterward to make those colors POP! Therefore, here I'm sharing my secret on how to create the perfect sunset editing on Lightroom for you to use on the next "golden hour". Plus, a special gift at the end of this tutorial!!!! So keep reading. 😉

For this, you will need to download the Lightroom app if you don't have it already. This is not sponsored or anything (I wish, LOL!). The app is FREE to download and use in your mobile device, although it offers upgrades and in-app purchases.
Version for the App store:
Version for Google Store (Android):
Version for Mac and PC:
(DISCLAIMER: Both Mac and PC versions MUST be subscribed to an Adobe Membership starting at $9.99 per month in an ANNUAL commitment. The package includes Lightroom + Photoshop or some other Abobe products of your choice. They offer a 7-days free trial which I'll link for you but be careful to cancel before your trial is over, otherwise you will get charged a cancellation fee which is around $25 depending on your plan. Learn from my mistake and don't get charged because you're canceling before the YEAR COMMITMENT is over. Been there, done that. Whoopsie. 🙃)
Ok, now to the juicy information! The great thing about this app is that even with the free mobile version, you have lots of controls and adjustments for your pictures. This is the app the I use probably 85% of the time and that I know how to use the best.
Let's work on a very simple picture of a normal sunset in Manhattan. LEFT is the UNEDITED picture and RIGHT the EDITED picture :

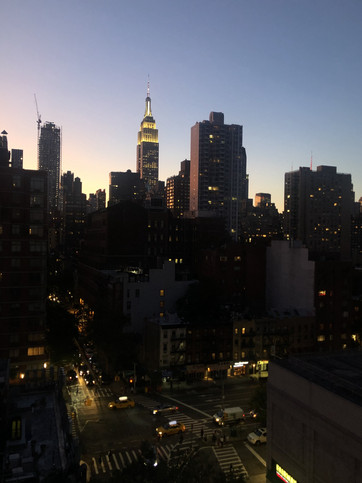


Ah so much better! I achieved to make the purple pop and the details stand. You can see the cabs so much better so it gives that very New York effect. Here is how I did it:
Setting on all the picture:
Light Section:
Exposure: +0.30
Contrast: 0
Highlights: -62
Shadows: +100
Whites: 0
Blacks: 0
Color Section:
Temp: 0
Tint: 0
Vibrance: -3
Saturation: -7
Effects Section:
Main effects remain: 0
Open Split toning:
Highlight: H: 0 S: 16
Shadows: H: 30 S: 2
Detail:
Sharpening: 25
Color Noise Reduction: 25
Default numbers in the rest of the settings.
Setting on certain sections using "Selective":
Editing on the sky using "Selective"
Light Section:
Exposure: -0.48
Color Section:
Tint: +78
Editing on the building using "Selective"
Color Section:
Temp: +30
Now, that we know all is about playing with the Tint, Shadow, Split Toning and Selective settings, let's apply it on a different picture.


Since this picture was taken in winter and it's brighter naturally, I don't really need to get rid of too much darkness. Mostly we'll work on the sky with the setting Tint, Temp, and Split Toning for the whole picture.
Setting on all the picture:
Light Section:
Exposure: +0.17
Contrast: +6
Highlights: -43
Shadows: +22
Whites: -53
Blacks: +31
Color Section:
Temp: +19
Tint: 0
Vibrance: 0
Saturation: 0
Effects Section:
Main effects:
Texture: +9
Clarity: +17
The rest remain: 0 or default.
Open Split toning:
Highlight: H: 0 S: 5
Shadows: H: 0 S: 15
Detail:
Sharpening: 40
Default numbers in the rest of the settings.
Setting on certain sections using "Selective":
Editing on the sky using "Selective"
Light Section:
Exposure: -0.83
Color Section:
Tint: +55
Saturation: +18
Temperature: +8
Remember all these numbers DO NOT need to be perfect and exact. Play around with the settings and the color section until you achieve what you are looking for. This is what I usually do but there's no default number to achieve the same result on all the pictures.
BUT, there are good news...
As a special surprise for you for staying until the end, I'm gonna give YOU the Preset of the Manhattan Sunset for FREE!!!!! This way, the only thing you have to do is COPY AND PASTE the settings on Lightroom and then go from there if you need to!!! This will save you a lot of time and will allow discovering more settings and what works best for your photo.
You can download the .DNG document from this link:
To add the Preset to Lightroom, follow the next steps, I've added pictures for guidance:
1. Download the .DNG image to your Camera Roll or Picture Folder.
2. Open Lightroom and click on "Add Picture".
3. Add the .DNG image, don't worry if it looks black on the camera roll, you saved it properly! Click on it to add.
4. Press on the Check Mark on the Upper Right Corner to "Accept".
5. Now, you will see it in "All your Photos" and ready to use.
6. Open the Picture and open the menu by clicking on the Upper Right Corner.
7. Click on "Copy Settings"
8. And that's it! You can Paste Settings on any other picture you desire.


I really hope you find this useful. Of course, let me know any questions and I'll reply as soon as possible. Don't forget to tag me or let me know if you use this preset in any of your next sunset pictures.
Sandra, xx


Comments